Advantages of a Custom Website versus using a Website Builder Tool
Tuesday, December 23, 2008 0 commentsThe internet has revolutionized business all around the globe. Almost every competent new or existing business wishes to exploit the incredible potential of the internet, and the first step is to have a web site designed done and maintained by a professional web site design service or build and maintain it yourself. One of the first things to consider is your computer ability. If you despise computers and software and find them confusing and frustrating then building your own website can be quite a task. One that you may not want to undertake. However, if you enjoy working with computers and learning new things or if you just have the patience to stick with it, then building a website is within your grasp. You may also decide to do it yourself to save cost. If you still feel that you want to build your own site you should choose software that is easy to use and user friendly.
Read More>>
Silhouettes Creation Using Adobe Photoshop
0 commentsby: Blur Loterina
Do you want your image to have that commercial look? If you want to learn how to make a stunning background like what you always see on posters, follow these simple steps.
When you read a magazine, try to focus on the ad pages. Can you see cigarette ad with valleys and lakes for a background? Or a waterfall that was set behind a bar of soap? These images are called silhouetted images. When you say silhouette, it means that an image does not have a background of its own. It uses either text or other images as its environment. But before you can make this kind of image in Photoshop, you will have to create a Clipping Path first.
Optimizing Images in Photoshop with Curves & Levels
Thursday, December 18, 2008 0 comments
Now that Curves includes the ability to adjust the black and white points in my images, is there any reason to use Levels?
Actually, Curves has always had (or at least for as long as I’ve been using PhotoShop) the ability to adjust the black and white points for your image in a manner similar to Levels. The curve always had end points that could be moved inward (or elsewhere if you wanted) to set the black or white point for the image. So you could always achieve the same effect with Curves that you could with Levels.
Continue>>Creating Envelopes in Adobe Illustrator
0 comments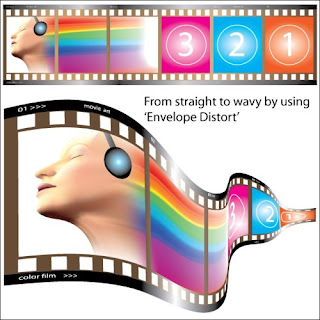
If there is one thing I really love about Adobe Illustrator, it has to be reshaping objects with an “envelope.” Real envelopes are pretty boring things -- you can only use them for mailing letters. But in this tutorial, you'll discover just how powerful and versatile Adobe Illustrator’s “Envelope Distort” is for reshaping almost anything. Yes, anything -- it's amazing! You'll be stuffing envelopes all day long, because the first thing to remember is whatever you put inside an envelope, you will be able to distort. This includes raster graphics, objects drawn with the pencil and brush tools, paths, gradient meshes and even unexpanded text, linear gradients and objects that have had 3D effects applied to them. It is really a powerful tool, so let's dive in and get started by creating the envelope.
Try Now>>
Paste by remembering layers in Illustrator
Monday, September 8, 2008 0 comments
If you work with files that have a common base and several custom layers for languages or other mutations, you should always remember to switch on the Paste Remember Layers option in Illustrator. You will find this option by clicking the little contextual menu icon in the top right corner of the layers pane. Try it Out>>>
Tips & Tricks:
Sunday, September 7, 2008 0 commentsThe Client Worth Chasing--Even If There's (Seemingly) No Profit
Friday, September 5, 2008 0 commentsSet your Illustrator tools to grey
Thursday, September 4, 2008 0 comments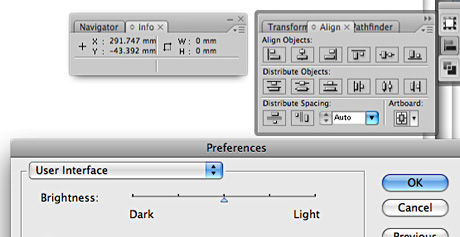
When you work with Illustrator documents your document's background is mostly white. The interface of the application, such as the panes and the toolbox are also white by default. This puts some strain on your eyes and brain when you're trying to identify each area. To relieve this extra effort you may want to experiment changing the background of the user interface to a shade of grey instead of white. Try it Out >>>
Forensic Lightroom 2 Tutorial - Importing Photos Into Photoshop Lightroom 2
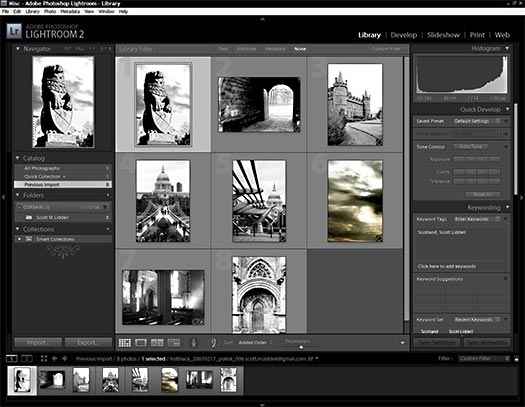
Wednesday, September 3, 2008 0 commentsWe'll start the discussion on importing images into Lightroom 2 by looking at those images that were captured by another device and already exist on our system (internal or external storage device). Select File>New Catalog to start with a fresh catalog. When we do, Lightroom will relaunch and you'll see a screen that looks like this - an empty catalog viewed in the Library Module. Try it Now>>>
Backing Up And Resetting Your Photoshop Preference Files
0 commentsHow many of us use a dedicated back-up software or software/hardware combination? I think that the percentages are quite small. Most save their important files to an external hard drive and hope for the best.
In choosing what's important enough to send to your hard drive, do you include your Photoshop preference file? Try It Out>>>

New Photoshop Actions Sets — Surreal Colors And Tritones
0 commentsWith our ‘Surreal Colors & Tritones’ we are combining not only different colors & techniques, but also giving artists several different ways to customize the effect. So they have several creative ways to go with many of the ‘actions.’ Read More>>>

Photoshop Fundamentals: Create a Blueprint Effect
0 comments
Photoshop Toning Techniques
0 comments
How To Handle Thorny Clients
0 commentsLet's digress from the Marketplace this week. I have something more interesting!
Over the last year my business has enjoyed a significant leap in revenue and profitability. This increase came at a time when we initiated what we called the "No Jerks" clause.
It works like this: if you're a client of ours and you become too demanding or unreasonable, then we stop doing business with you. Not in a mobster kind of way, but in a gentler "we don’t think we can help you anymore" kind of way. Read More>>>
Designing A Catalog From Conception To Completion
Thursday, June 19, 2008 0 comments Big or small, no matter the client or subject, good design and implementation of that design should never be sacrificed. If you are handed a project where you need to create a new (or update an existing) marketing piece such as Packaging, Logo, Brochure, Catalog, etc. it is your job as a professional designer to make the piece appealing and functional not only to your client, but to their target market as well. Regardless of how the piece was designed in the past, embrace the challenge of updating that design for the future. Read More>>
Arrow-Controlled 3D Ball Tutorial 1 (Flash)
Tuesday, June 17, 2008 1 comments
How to Make an HDR Image in Adobe Photoshop Cs3
Monday, June 16, 2008 0 comments
Try it Out>>
Flash Cs3 Tutorial, Sound
Sunday, June 15, 2008 0 commentsGreat New Flash CS3 Tutorial on working with sound.
In this Flash CS3 Tutorial I am going to go over Using Sound, after all what Flash game would be complete with out the great sound effects. In Flash CS3, there are basically three ways to play a sound:
- Import the sound into the library, then add the sound to a key frame in the time line.
Dodging and Burning Done Right
Saturday, June 14, 2008 0 commentsDodging and burning have their roots in the film days, and involve the selective lightening and darkening of parts of a photo. Because of that, there happen to be Dodge and Burn tools in Photoshop, but their effect is very much a permanent and destructive one. That said, I love using the concept of dodging and burning to really lead a person through the photo by lightening the areas I want them to focus on and darkening the parts of the photo that I don’t. That’s where this technique comes in, because it gives you all the flexibility of working with dodge and burn layers without any of the permanent effects. Try the Tutorial>>
Cool Photoshop Tutorial: Planets in Universe
Friday, June 13, 2008 0 commentsEver wonder how images like planets in the universe are done in Photoshop? Here's a short basic technique. Check it out>>
This Weeks Tips: We Like the Curved Look
Thursday, June 12, 2008 0 commentsCongratulations! You've taken a magnificent photo or you've just purchased the perfect one for your project. The end is not so near, though because as a design professional you want to put your custom stamp of creativity on the image.
Many beginner designers open the Curves tool, slide the point left or right, close the box and often undo the change. Once you master the subtleties of the Curves tool, it will be your most powerful tool for controlling tonality and color regardless of whether your image is too light or too dark.
Here are some Curves tips the iStock design team picked up from the Kelby Training PhotoShop CS3 conference today in Calgary. Think of Curves as a blind on a window. When the blind is all the way down, there's no light or total blackness, when it's all the way up you have maximum light or white.
- If there's an area of the image you would like to darken to bring out the detail of a shot, open Image>Adjustments>Curves. Then click and hold the eye-dropper tool to see the area you want to lighten, noted by the hollow circle moving on the graph.
- As you are using the eye-dropper control and click (PC) or command and click (Mac) and this will create a first point (Point A) on your Curves graph. From here you want to drag that point down (not left or right) to darken it. You may notice that this darkens the rest of your image, but don't worry.
- To correct this extra darkness, create a new point (Point B) by clicking in the Curves graph just under Point A. Point B is your fixing point and you should move that point ever so slightly, keeping it beneath Point A, until the tonal range is to your liking.
Banish your fear of Curves forever!
Create a 3D Product Viewer in Flex 3
0 commentsRead More >>
How do I… Build and configure an external hard drive enclosure?
Monday, June 2, 2008 0 commentsHigh Dynamic Range Photography In Photoshop CS3 - Step-By-Step HDR Tutorial
Saturday, May 31, 2008 0 comments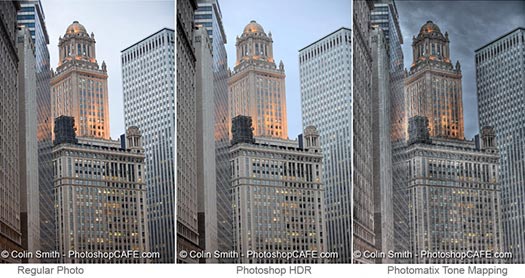
"In this tutorial we will take a look at HDR photography. HDRI (High Dynamic Range Imaging) was originally used in 3D and is now in full force in photography. Basically it's the process of taking multiple exposures and merging them together into a single 32 bit image. Read More and Try the Tutorial.
This Week's Tip: Find Your Inner Creative Rebel
Friday, May 30, 2008 0 comments
As a creative, you’re a rebel by nature, but it’s easy to feel trapped under a boring, non-risqué cloud where it rains isolation and discouragement. iStock wants you to banish that stormy disposition with a furious hurricane of risk, creativity and exploration.
1. Take Risks – Rebels don’t follow rules, so start by admitting what habits you retreat to when you’re uninspired. Introduce alternatives to those habits, which will throw off your routine. Try a new cafe, change your haircut or leave your house more.
2. Invite Creativity – If you’re a photographer, take your camera somewhere unfamiliar. You never know what you’ll see on a trip to the dump or a walk through the neighbourhood on the other side of the train tracks (iStock’s HQ is on the other side of the tracks, for inspiration purposes, of course). If you’re more of an illustrator, take your sketchbook everywhere, from a garage sale to the aquarium, you just never know when inspiration might strike.
3. Seek Inspiration – Whose art baffles your mind or arrests your soul? Not sure? Well, now’s the time to find out. iStock’s Design Spotlight, Article of the Week and Artist of the Week are a good place to start. Branch out to the ultimate rock stars of your genre who you dream of one day competing with. Take a tutorial you've been avoiding.
4. Scrapbook it – No, not quite like your mother used to do. Gather artifacts like photos, ads, concert tickets, articles, lucky shoelaces or fabric samples. Whatever floats your boat and stirs your imagination.
5. Surround Yourself with Creativity – Pump up the volume on your stereo or iPod, rent that old Alfred Hitchcock flick or play a little music to get into that creative space.
5. Challenge Yourself – Test your skills in one of iStock's friendly competitions: Vector Challenge or Cage Match.
With creativity, those who add more risk and adventure will find more creative rewards. Now, go mix it up!
Uploading Files Using CGI and Perl
Thursday, May 29, 2008 0 commentsClicking Submit to send the data to the server (click to view image)

Easy Rich Internet Applications With ColdFusion 8
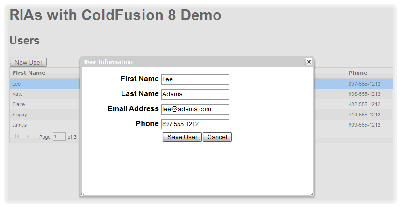
Wednesday, May 28, 2008 0 comments2. A User Information window launches from the data grid (click to view image)
Portable Apps: A Mobile Office For A Desktop Computer
Tuesday, May 27, 2008 0 comments Figure 1: The PortableApps Suite (click to view image)
Photoshop: Auto Close Crop
Tuesday, April 15, 2008 0 commentsBy Lesa Snider King:
When cropping images closely for use on the Web, it’s easy to nick drop shadows and the like. Next time, choose Image > Trim. In the resulting dialog, determine which pixels to zap—transparent or the color at the top left or bottom right of the document—and press Okay. Photoshop does the close cropping for you.
Lesa Snider King, The Graphic Reporter, is iStockphoto's Chief Evangelist.
The Principles of Beautiful Web Design
Monday, April 14, 2008 0 comments
For many web developers, myself included, the most intimidating part of the design process is getting started. Imagine for a moment that you're sitting at your desk with nothing other than a cup of coffee and the business card of a potential client who needs a basic corporate web site. Usually, a business card speaks volumes about a company's identity, and could be used as design inspiration.
Read More Sitepoint.com
Tomorrow's CSS Today: 8 Techniques They Don't Want You To Know
Sunday, April 13, 2008 0 comments
With all the hype over new and upcoming browser support for advanced CSS features, developers can be confused about the CSS they can include in web projects today. Many of the more advanced features aren't widely supported by the dominant browsers, but some very useful ones are -- including newer features from CSS3.
View the Tutorial
Fancy Form Design Using CSS
0 comments
Forms. Is there any other word that strikes as much fear into the hearts of grown web designers?
View Tutorial Sitepoint.com
Photoshop Fundamentals: Using the Pattern Stamp Tool
Friday, April 11, 2008 0 comments
This creative tool allows you to paint on an image using pre-defined patterns. You can use the patterns that are already in the Photoshop pattern libraries or you can create your own patterns, like the yellow rose in this tutorial. When you click on the Pattern Stamp tool from the Photoshop toolbar, the options for the tool will show across the top of the screen. The options bar allows you to change the brush and brush size. You’ll then pick the rose pattern created earlier in the technique, select a layer and start painting.
On to the Tutorial
The Anatomy of Web Fonts
Thursday, April 10, 2008 0 comments
If one aspect of design has suffered most in its transition to the Web, it is the art of typography. For years, Web typography involved little more than choosing a typeface and font size. Unstyled Times New Roman was the norm, and the integration of established typographical techniques and rules was unimagined.
Continue Reading Sitepoint.com
InDesign Shortcuts: Special Characters
0 comments
Setting type frequently requires the use of symbols, typographically appropriate punctuation and invisible characters that are not easily found on the keyboard. Adobe® InDesign® CS3 has come to the rescue by collecting many of these characters and putting them in an easily-accessible flyout palette off the main menu. This handy palette saves you from having to memorize dozens of hand-contorting key combinations and from looking through hundreds – sometimes thousands – of characters in the Glyph palette.
Read More Upper and Lower Case Magazine
How do I… Add music and narration to a PowerPoint presentation?
Wednesday, April 9, 2008 0 comments
The best presentations engage the audience using a number of creative tools. Sound effects, such as music and voice recordings can mean the difference between a good presentation and an outstanding presentation. You can energize your audience with a quick tempo, play your company’s latest jingle, or add narration to an on-demand presentation. At the very least, you can play music at the beginning and ending of a presentation as the audience enters and leaves the room. The only limits are good taste and your imagination. Click for More
Versatility with Video Editing
0 comments
Need some moving pictures in your life? iStock’s video footage collection has been growing steadily since its launch in 2006 with more than 87,000 video footage clips. If you’re already the proud owner of an iStock video file, you may have noticed that editing video has a few more technical hoops to jump through than editing photos before you can start to work with it.
For those of you editing in Final Cut Pro who have downloaded HD 720 files from iStock, only to find that FCP does not recognize the file, don’t give up.
When you get a message saying “File Error: 1 file(s) recognized, 0 access denied, 1 unknown,” here’s what you need to do to fix the problem:
- Open the file in Quicktime and choose File: Export.
- In the bottom of the resulting window, click the drop-down menu to select “Movie to QuickTime Movie”.
- Click the Options button beside that drop-down menu to view the Movie Settings panel.
- Click on the Settings button. The Compression type should be photo JPEG. Click on the Frame Rate drop-down and make sure it is set to exactly the frame rate advertised on the iStock download page (For example, if you downloaded a 29.97 file, then select 29.97).
- Check that the Quality Slider is set to best then click OK.
- Pick a location for the export and click Save.
This problem is not very common and only occurs with Final Cut Pro, but if this doesn’t solve your conundrum, please don’t hesitate to create a Support Ticket.
How to Make Your Own Fonts
Friday, April 4, 2008 0 comments
Okay. Fine. I'll let the secret out. This tutorial explains my personal font-making technique. It may not be the academically approved typographic design process, but it works for me, and it can be done on any Mac or PC with the proper software installed. You've been working with the alphabet since you were a small child. Now you can make a font of your own.
Let's get started! Chank.com
How to create a click-through mock-up with Adobe Fireworks CS3
0 comments
Fireworks has always been a great tool for editing and creating screen graphics, but Fireworks CS3 brings a stronger focus to the term "rapid prototyping." With the introduction of pages, master pages, and shared layers, it is easier than ever to design a variety of page layouts for client feedback and then modify and slice an approved design for use in the final web page.
Continue Reading
Create great sound experiences with Adobe Soundbooth CS3
0 comments
When you're working in Flash, you're striving to create a great visual experience. However, many Flash projects also include audio, so having great sound quality is just as important to the overall experience. What do you do when the audio portion of your project has noise or pops in it? How do you record a voice-over for an animation? Perhaps you have an audio engineer you can turn to for help, or maybe you've got an old copy of Cool Edit 2000 kicking around somewhere. Better yet, grab a copy of the latest audio tool from Adobe: Soundbooth CS3.
Continue Reading
Creating Fallen Snow in a Landscape Using Photoshop
Thursday, March 27, 2008 0 comments
Here is a very simple way of creating fallen snow on a landscape. It doesn't work for all landscapes, but when it does it is surprisingly effective. Graphics.com Forum
How To Use “Editorial Use Only” Images
0 comments
by Angela Cho, Graphic Designer, Shutterstock
Consider this situation… you are designing a brochure that will be used to promote football uniforms and you would like to include some dynamic images in the design. You search through Shutterstock’s extensive library of over 3 million images and see a great photo of football players that would fit perfectly in your design. However, you notice that below the photo it reads "Editorial Use Only" in the release information. Read More Shutterstock.
Photoshop: LightRoom Web Gallery
0 commentsBy Lesa Snider King:
If you own Adobe Lightroom, you can quickly create and upload a web photo gallery to share with friends and family (or prospective clients). Oh yes, you can make Lightroom do all the work for you. Just click the Web button at the top right, choose a design template, then tweak the color palette, gallery description, etc. using the panels on the right. Scroll all the way to the bottom, and you'll see an option for uploading to your FTP server. Simply enter the information once, then save the gallery as your own template. The next time you create a gallery, choose your template from the listing on the left, change the gallery description and FTP directory (if necessary) and click Publish.
Lesa Snider King, The Graphic Reporter, is iStockphoto's Chief Evangelist.
Web Domination Using Photoshop
Friday, March 21, 2008 0 comments
If you're familiar with Photoshop, you're probably eager to toy with its many features. In this article, we'll cover some of the basic tasks that Photoshop users should master, such as resizing and rotating documents and layers, working with masks, creating curves and custom shapes, working with transparent images, and more! Sitepoint.

![Reblog this post [with Zemanta]](http://img.zemanta.com/reblog_e.png?x-id=04eaf320-5bed-4820-bcfb-2f47f71e38eb)
![Reblog this post [with Zemanta]](http://img.zemanta.com/reblog_e.png?x-id=b4dadd4e-258c-48aa-95c5-13b813adc2ad)
![Reblog this post [with Zemanta]](http://img.zemanta.com/reblog_e.png?x-id=8abba1a8-f4b2-4ecb-8f71-c1d42aae1434)
![Reblog this post [with Zemanta]](http://img.zemanta.com/reblog_e.png?x-id=af87313a-25f0-4766-bfa8-8c7fbae26b55)
![Reblog this post [with Zemanta]](http://img.zemanta.com/reblog_e.png?x-id=dc5e4594-0a2f-4347-8a5c-f30ba66cfa08)
![Reblog this post [with Zemanta]](http://img.zemanta.com/reblog_e.png?x-id=c5fb76ac-a703-484e-9b1b-87ff23439eec)
![Reblog this post [with Zemanta]](http://img.zemanta.com/reblog_e.png?x-id=07cb1883-3761-4da9-9e55-aa9b033c08f3)
![Reblog this post [with Zemanta]](http://img.zemanta.com/reblog_e.png?x-id=5ce1afed-23fa-4b6d-99e3-189ddc7118cb)
![Reblog this post [with Zemanta]](http://img.zemanta.com/reblog_e.png?x-id=0143e4d8-92b0-4bae-9d9e-bc5307aa6d23)
![Reblog this post [with Zemanta]](http://img.zemanta.com/reblog_e.png?x-id=532cc703-74a4-497e-ac55-71a4b9be0320)
![Reblog this post [with Zemanta]](http://img.zemanta.com/reblog_e.png?x-id=409581b6-1ab3-4cce-916e-4ddd0b8f403d)
![Reblog this post [with Zemanta]](http://img.zemanta.com/reblog_e.png?x-id=2c5dc885-40c3-4bff-a899-cf5b90dc4084)


