
 Big or small, no matter the client or subject, good design and implementation of that design should never be sacrificed. If you are handed a project where you need to create a new (or update an existing) marketing piece such as Packaging, Logo, Brochure, Catalog, etc. it is your job as a professional designer to make the piece appealing and functional not only to your client, but to their target market as well. Regardless of how the piece was designed in the past, embrace the challenge of updating that design for the future. Read More>>
Designing A Catalog From Conception To Completion
Thursday, June 19, 2008 0 comments
We are very excited to have Elle Phillips guest write for us this week. Please visit her fabulous portfolio to see more of her wonderful work. You will find that this catalog design article is very well written, informative, and extremely helpful. She wrote this article to guide you through her own graphic design process, from conception to completion. Please feel free to contact us if you want to submit your article as well.
 Big or small, no matter the client or subject, good design and implementation of that design should never be sacrificed. If you are handed a project where you need to create a new (or update an existing) marketing piece such as Packaging, Logo, Brochure, Catalog, etc. it is your job as a professional designer to make the piece appealing and functional not only to your client, but to their target market as well. Regardless of how the piece was designed in the past, embrace the challenge of updating that design for the future. Read More>>
Big or small, no matter the client or subject, good design and implementation of that design should never be sacrificed. If you are handed a project where you need to create a new (or update an existing) marketing piece such as Packaging, Logo, Brochure, Catalog, etc. it is your job as a professional designer to make the piece appealing and functional not only to your client, but to their target market as well. Regardless of how the piece was designed in the past, embrace the challenge of updating that design for the future. Read More>>
Arrow-Controlled 3D Ball Tutorial 1 (Flash)
Tuesday, June 17, 2008 1 comments
This is the first part of a tutorial in which I will be showing you how to make a 3D looking ball, and to move it using the arrow keys. Try it Out>>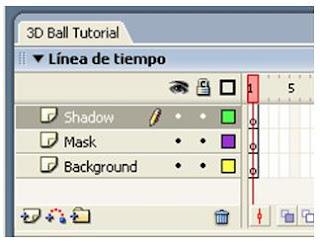

How to Make an HDR Image in Adobe Photoshop Cs3
Monday, June 16, 2008 0 comments
A quick step-by-step tutorial on one of the newest technologies in Digital Photography. HDR images allow a wider range of detail than possible before, essentially allowing you to create Large Format Images digitally.
Try it Out>>

Try it Out>>
Flash Cs3 Tutorial, Sound
Sunday, June 15, 2008 0 commentsGreat New Flash CS3 Tutorial on working with sound.
In this Flash CS3 Tutorial I am going to go over Using Sound, after all what Flash game would be complete with out the great sound effects. In Flash CS3, there are basically three ways to play a sound:
- Import the sound into the library, then add the sound to a key frame in the time line.
Dodging and Burning Done Right
Saturday, June 14, 2008 0 commentsDodging and burning have their roots in the film days, and involve the selective lightening and darkening of parts of a photo. Because of that, there happen to be Dodge and Burn tools in Photoshop, but their effect is very much a permanent and destructive one. That said, I love using the concept of dodging and burning to really lead a person through the photo by lightening the areas I want them to focus on and darkening the parts of the photo that I don’t. That’s where this technique comes in, because it gives you all the flexibility of working with dodge and burn layers without any of the permanent effects. Try the Tutorial>>

Cool Photoshop Tutorial: Planets in Universe
Friday, June 13, 2008 0 comments
Here's a cool Photoshop technique that creates planets in the universe.
Ever wonder how images like planets in the universe are done in Photoshop? Here's a short basic technique. Check it out>>
This Weeks Tips: We Like the Curved Look
Thursday, June 12, 2008 0 commentsCongratulations! You've taken a magnificent photo or you've just purchased the perfect one for your project. The end is not so near, though because as a design professional you want to put your custom stamp of creativity on the image.
Many beginner designers open the Curves tool, slide the point left or right, close the box and often undo the change. Once you master the subtleties of the Curves tool, it will be your most powerful tool for controlling tonality and color regardless of whether your image is too light or too dark.
Here are some Curves tips the iStock design team picked up from the Kelby Training PhotoShop CS3 conference today in Calgary. Think of Curves as a blind on a window. When the blind is all the way down, there's no light or total blackness, when it's all the way up you have maximum light or white.
- If there's an area of the image you would like to darken to bring out the detail of a shot, open Image>Adjustments>Curves. Then click and hold the eye-dropper tool to see the area you want to lighten, noted by the hollow circle moving on the graph.
- As you are using the eye-dropper control and click (PC) or command and click (Mac) and this will create a first point (Point A) on your Curves graph. From here you want to drag that point down (not left or right) to darken it. You may notice that this darkens the rest of your image, but don't worry.
- To correct this extra darkness, create a new point (Point B) by clicking in the Curves graph just under Point A. Point B is your fixing point and you should move that point ever so slightly, keeping it beneath Point A, until the tonal range is to your liking.
Banish your fear of Curves forever!
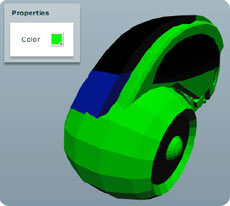
Create a 3D Product Viewer in Flex 3
0 comments
If you're going to experiment with Flex 3, you might as well create something cool, right? With only a small amount of code, Jack shows you how to create an awesome 3D model of a light cycle from the movie Tron that your users can view, rotate, change the color of, and more!
Read More >>
Read More >>
How do I… Build and configure an external hard drive enclosure?
Monday, June 2, 2008 0 comments
Do you have an old hard drive, which still works, lying around and gathering dust that you’d like to put to good use? If you answered yes, then chances are good that you’ve thought about using your old drive as an external hard drive. Fortunately, building an external hard drive is an easy task. Since you already have the hard drive, all you need is an enclosure, a screw driver, and less than an hour of your time. Let’s take a look. Read More>

Subscribe to:
Posts (Atom)


